


MidWest Poquito Avian Hotel Travel Carrier Bird Cage
Price range: $54.98 through $65.02
- Shop with Ease
- Hassle-Free Payments
- Excellent customer service online in a timely manner
- Elevate Your Shopping Experience

Details
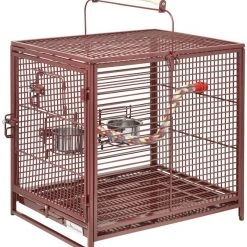
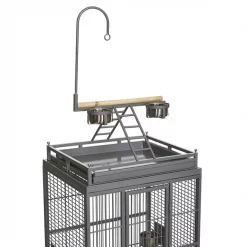
- Included in this cage set are 2 stainless steel food cups, one cotton rope perch, one natural wood play-top perch.
- Lightweight & durable for a longlasting and easy to move set up.
- Smooth, glossy, translucent jewel-toned ruby finish.
- Specifically designed for travel, boarding, and other on-the-go scenarios.
- Easy to assemble and no tools required.
MidWest Poquito Avian Hotel Bird Cage is a sturdy cage specifically designed for travel with your pet bird. The beautiful, lightweight “hotel” is easy to assemble and includes a perch carry handle. There’s also a slide-out tray that can be used as an out-of-cage play area. The lightweight, durable cage features all the comforts of your bird’s regular cage and is available in ruby and platinum color, to fit well with the décor of your final destination.
Specifications
| Item Number | 103831 |
|---|---|
| Dimensions | 14 x 18 x 14 inches |
| Cage Bar Spacing | 1/2 inch |
| Bird Type | Canary, Parakeet, Cockatiel, Pigeon, Finch |
| Material | N/A |
What’s Included
Bird cage with perch carry handle, (2) stainless steel outside-access food cups, formable cotton-rope perch.
Instructions
Unwrap and remove all parts from the box. Keep the box and all packing materials until the cage is fully assembled and inspected. In case of return or exchange, failure to return product in similar condition as received could result in limited reimbursement. Check to insure you have all of the following parts:
- Front Panel
- Back Panel
- Side Panel without Doors
- Side Panel w/2 Doors
- Top Grate
- 4 Latches
- Perch Handle
- Bottom Grate
- Bottom Tray
- Rope Perch
- 2 Cupholders
- 2 Cups
- Metal Lever & Install Screw & Spring
- Bottle of Touch-up Paint
Cage Assembly:
- On the bottom interior of both the FRONT and BACK PANELS there are 2 small prongs jutting up. Take the FRONT PANEL and either of the 2 SIDE PANELS and insert the hollow square tube at the bottom of the SIDE PANEL onto the top of one of the prongs.
- Once that has been done you can insert the small arm at the top interior of the FRONT PANEL into the sleeve located on the interior of the SIDE PANEL you have been working with. While holding the FRONT PANEL and SIDE PANEL together, take the BACK PANEL and insert the second hollow square tube on the bottom of the SIDE PANEL you have been working with onto the corresponding BACK PANEL lower prong.
- Once that has been done you can insert the small arm at the top interior of the BACK PANEL into the sleeve located on the interior of the SIDE PANEL you have been working with. With 3 of the PANELS now connected, take the remaining SIDE PANEL and hook each of the bottom hollow square tubes on the SIDE PANEL into the corresponding FRONT PANEL and BACK PANEL prongs.
- Once that has been done you can insert the small arms at the top interior of the FRONT and BACK PANELS into the sleeves located on the interior of this second SIDE PANEL you have been working with.
- After the 4 primary panels are together, take the TOP GRATE with its 4 pairs of “feet” facing downward, and fit the 4 pairs of feet into the square tubes at the top of the 4 PANELS.
- Unscrew the balls on the LATCHES so that they are completely separated from the long portion of the LATCH. Take the long portion of the LATCH with the spring on the right side and insert it into any of the latch housings. Hold the LATCH inside the housing until you can see the threaded hole where the ball should be screwed inch Take the ball and screw it back into the threaded hole. Repeat for the other 3 LATCHES.
- To attach the PERCH HANDLE, align it so that its connector pieces are facing downward and are in the center of the TOP GRATE. The PERCH HANDLE is attached by slipping the connector piece’s round hole over the screw on the center of each side panel. PLEASE NOTE: There are 2 positions the PERCH HANDLE can be used inch When carrying/picking up the POQUITO by its PERCH HANDLE, the PERCH HANDLE slides upward in the connector so that the cage can be safely carried without separating from the cage. When the cage is immobile and the PERCH HANDLE is used as a play area, the PERCH HANDLE should be pushed downward so that it “locks.” This allows your bird to sit on top of it without the PERCH HANDLE moving around.
- Take the BOTTOM GRATE and slide it into the upper rail tracks.
- Take the BOTTOM TRAY and slide it into the lower rail tracks.
- Install the ROPE PERCH by unscrewing both ends of it, fitting the small slots on each exposed end of the ROPE PERCH in between any bar on the cage and then re-screwing the ends of the ROPE PERCH back on to it, but via the exterior of the cage.
- Install the CUPHOLDERS by fitting the 4 “feet” on the CUPHOLDERS into the 4 hollow tubes on the interior of the SIDE PANEL w/2 DOORS.
- Install the CUPS by opening the food doors and sliding the CUPS into the CUPHOLDERS.
- Assemble the METAL LEVER, and its installation SCREW and SPRING. Take the SCREW, fit the METAL LEVER over/onto it, and then fit the SPRING over the SCREW as well. When it is one complete piece, then screw the entire METAL LEVER assembly into the hole on the lower part of the FRONT PANEL. The METAL LEVER, when it is in the “Down” position, is designed to hold the BOTTOM TRAY and BOTTOM GRATE in place. When the BOTTOM TRAY and BOTTOM GRATE need to be removed, simply push the METAL LEVER to the side.
Size
| Size | Length | Width | Height |
|---|---|---|---|
| One Size | 14 inches | 18 inches | 14 inches |
| Color | Platinum, Ruby |
|---|
Be the first to review “MidWest Poquito Avian Hotel Travel Carrier Bird Cage”
Related products
Reviews
There are no reviews yet.